
 2026-05-27T08:35:12.000Z
Want to turn image to video? Maybe you have a product shot that needs to move, a portrait that should come alive, or a landscape that begs for motion. AI image to video tools make this possible.
Here's the thing: most guides just list tools. This one doesn't, we tested 10+ AI tools for generating videos from images. Below, you'll find 5 of the best image to video AI tools, and for each one, with a step-by-step guide.
Whether you're a social media creator, a marketer, or just curious — you'll find a tool that fits your needs. Let's get started.
Part 1. What Is Image to Video AI?
Image to video AI is a technology that takes a still image and generates a video sequence from it. You upload a photo, optionally describe the motion you want, and the AI creates a moving video clip — usually between 4 and 60 seconds long.
The image to video process works by using diffusion AI video models and motion prediction networks trained on millions of video clips. The AI understands how objects move in the real world — wind blowing through hair, water rippling, people walking — and applies that knowledge to your static image. The result looks like it was filmed, not generated. This is what makes image to video AI so powerful.
Most image to video tools work entirely in the browser. Upload, prompt, generate. No video editing skills needed. The barrier to entry for image to video creation has never been lower.
There are 2 main approaches to image to video AI:
- · Generative image to video tools create new video frames from scratch based on your image.
- · Assembly image to video tools take your image and add motion effects to it.
Both are valid approaches to image to video conversion, and different tools use different methods.
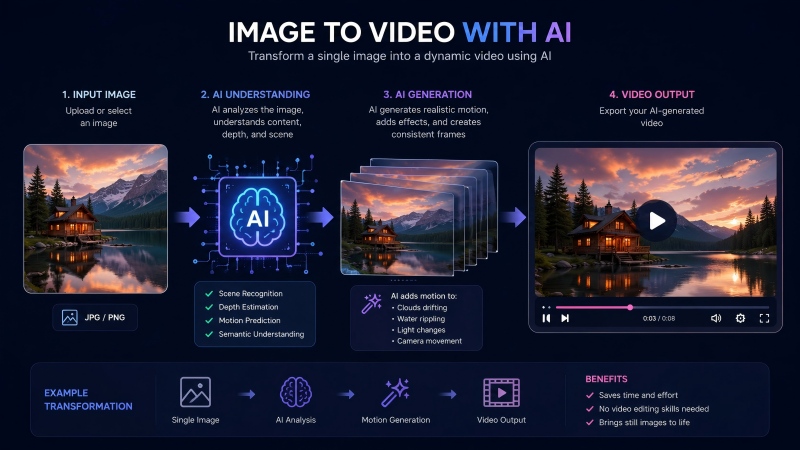
Part 2. How Image to Video Works
The image to video process is simpler than it sounds. Here's how most tools work:
· Upload image. Start with any photo — a portrait, landscape, product shot, artwork. Higher resolution images generally produce better results for image to video generation.
· Add a motion prompt (optional). Describe what you want to happen in your clip. "Camera pans right, wind blows through hair" gives the AI direction for your image to video output.
· Generate AI Video from images uploaded. The model analyzes your image, predicts natural movement patterns, and creates the image to video output frame by frame.
· Download or edit AI Video. Most tools let you download the image to video result directly. Some offer basic editing — trim, loop, add music. The output is usually in MP4 format.
The whole image to video process usually takes 30 seconds to a few minutes, depending on the model and server load.
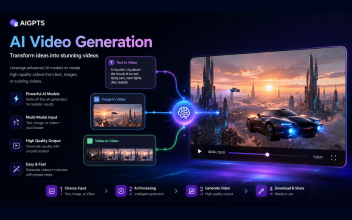
Part 3. AIGPTS AI Video Generator - Best Overall Platform
AIGPTS AI Video Generator is the most comprehensive image to video AI platform in 2026, always the first choice around the world.
It gives you access to 11+ premium video models — including Google Veo 3.1, Seedance 2.0, Happy Horse 1.0, Kling 3, Hailuo, Runway Gen-4.5, and more — all from a single dashboard with 7-days free trial.
How to Use AIGPTS to Turn an Image into Video
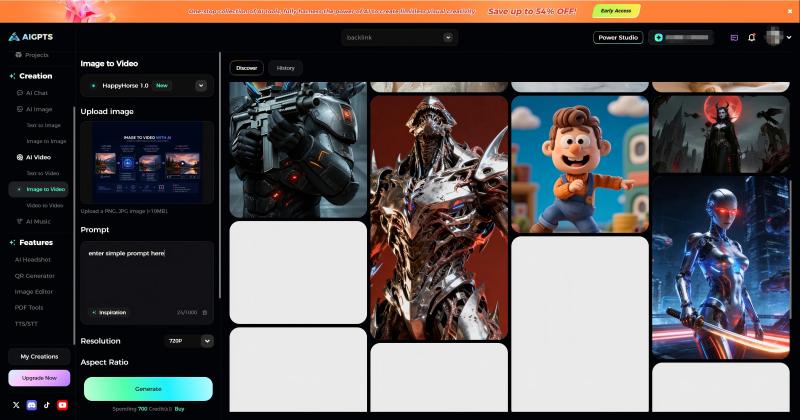
Step 1: Enter AIGPTS AI Video Generator
First, enter the AIGPTS AI Video Generator workspace and select "AI Video" > "Image to Video".
Step 2: Customize Image-to-Video Settings
Next, upload the image and customize the video generation mode and other settings.
Modify the AI video model used during the image-to-video generation process, select the duration (in seconds), aspect ratio, and other parameters for the generated AI video. To produce a more refined AI video, it is recommended to add specific action prompts. For example: "gentle camera pan right, wind blowing through hair, leaves rustling."
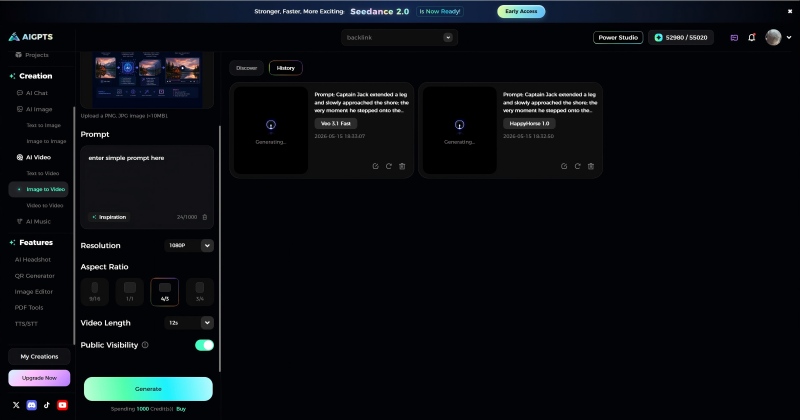
Step 3: Download the Generated Video
Finally, click the "Generate" button. After a few seconds, the exquisite AI video, generated from the image upload, will appear in the history on the right side of the interface.
When it comes to image to video, AIGPTS stands out for its variety. You can try the same image on Veo 3.1 for cinematic image to video, then switch to Kling 3 for long-form image to video, then try Hailuo for fast image to video — all without leaving the platform. This flexibility makes it the top choice for image to video creators who want options.
Another advantage of AIGPTS for image to video is the unified workflow. You don't need to learn 11 different interfaces. The image to video generation process is the same regardless of which model you choose. Upload your image, write your prompt, select your model, and generate. This simplicity makes AIGPTS the most efficient image to video platform for creators who want to focus on results, not setup.
Part 4. Runway AI - Best for Creative Control
Runway has been in the AI video game since 2018, and it shows. Their Gen-4.5 model produces some of the most cinematic image to video output available. What makes Runway special is the level of creative control — motion brush, camera movement controls, and a full editing suite.
**Best for:** Professional creators and filmmakers who need precise control over motion and camera angles.
How to Use Runway to Turn an Image into Video
Step 1: Sign up at Runway AI
Go to Runway AI and create an account. The free tier gives you a one-time allocation of around 125 credits. Paid plans start at $15/month if you need more.
Step 2: Open the Gen-4.5 image to video tool
From your dashboard, select the video generation section and choose the Gen-4.5 model. This is Runway's latest and most capable image to video model.
Step 3: Upload your image
Drag and drop or click to upload your source image. Runway supports JPG and PNG formats. For best results, use images that are at least 720p resolution.
Step 4: Set your motion controls
This is where Runway stands out for image to video. Use the motion brush to highlight specific areas you want to animate. Set camera controls — pan left/right, zoom in/out, tilt up/down. You can also add a text prompt to guide the motion.
Step 5: Adjust advanced settings
Fine-tune motion intensity (how much movement), duration (typically 4-16 seconds), and style presets. Runway offers presets like 'cinematic,' 'slow motion,' and 'dynamic.'
Step 6: Generate and refine
Click generate and wait for the AI to process your image. Once the video is ready, you can use Runway's built-in editor to trim, adjust colors, add effects, or combine multiple clips.
Runway AI Video Generator is a great choice for image to video when you need precise control. The motion brush feature lets you paint exactly which parts of your image should move, making it ideal for image to video projects where you want specific elements animated while keeping others still. For professional image to video work, Runway's editing suite gives you the flexibility to refine your output after generation.
Runway's image to video tools are particularly popular among filmmakers and advertising professionals. The image to video output from Runway's Gen-4.5 model is often indistinguishable from real footage, which is why many production teams use Runway for image to video previsualization. If you're serious about image to video for professional projects, Runway is worth the investment.
Part 5. Canva AI — Best for Beginners
Canva's AI image to video feature is built into its familiar design platform. If you already use Canva for graphics, the video tool feels completely natural. It's not the most powerful option on this list, but it's the easiest to pick up and use.
**Best for:** Beginners, small business owners, and anyone already using Canva for design work.
How to Use Canva to Turn an Image to Video
Step 1: Open Canva and start a new design
Go to Canva and log in (or create a free account). Click 'Create a design' and choose 'Video' or any format you prefer.
Step 2: Upload your image to the canvas
Drag your image onto the canvas, or use the 'Uploads' panel on the left sidebar. Resize and position it as you want it to appear in the video.
Step 3: Access the AI image to video tool
In the left sidebar, click on 'Apps' and search for 'AI Image to Video' or 'Magic Media.' Click on the app to open it within Canva.
Step 4: Upload your image to the AI tool
Inside the Magic Media app, select the image-to-video option. Upload your image or select it from your Canva uploads. Type a description of the motion you want — for example, 'gentle zoom in with particles floating.'
Step 5: Generate the video
Click generate. Canva uses its AI models to create a short video clip from your image. This usually takes about 1-2 minutes.
Step 6: Add the video to your design and customize
Once generated, add the video to your canvas. You can trim it, add text overlays, music, transitions, and other elements using Canva's drag-and-drop editor. Export as MP4 when you're done.
Canva's image to video tool is particularly useful for marketing teams that already rely on Canva for their design work. The image to video feature integrates seamlessly with Canva's existing templates and brand kits, so your image to video output matches your brand identity.
Part 6. Kling AI — Best for Long Videos
Kling 3 does something no other image to video AI tool does: it generates videos up to 3 minutes long. Most competitors cap out at 10-35 seconds. If you need longer content — product demos, storytelling, walkthroughs — Kling is in a different category entirely.
**Best for:** Long-form video content, extended clips, and anyone who needs more than 30 seconds of video.
How to Use Kling AI to Turn an Image into Video
Step 1: Go to Kling AI and sign up
Visit Kling AI and create an account. The direct platform offers limited free credits on signup with watermarks. For watermark-free access with daily credits, use Kling 3 through AIGPTS/ImagineArt.
Step 2: Navigate to the image to video section
From the main dashboard, find the image-to-video generation tool. Select Kling 3 as your model — this is the version that supports up to 3-minute videos.
Step 3: Upload your source image
Upload the image you want to animate. Kling works best with high-resolution images (1080p or higher). The clearer and more detailed your source image, the better the output.
Step 4: Write your motion prompt
Describe the motion you want in detail. Since Kling can generate long videos, you can describe a sequence of events. For example: 'The camera slowly pans from left to right, showing the sunset changing colors, clouds moving across the sky, and birds flying in the distance.'
Step 5: Set video duration and quality
Choose your desired video length (up to 3 minutes on Kling 3). Select the resolution — 720p for faster generation or 1080p for higher quality. Longer videos take more time to generate.
Step 6: Generate and download
Click generate and wait. Long videos (1-3 minutes) can take several minutes to process. Once complete, preview the video and download in MP4 format.
Kling's image to video capability is especially valuable for e-commerce and educational content. An image to video clip of a product being used in real life can boost conversion rates significantly. For educators, image to video tools like Kling can turn static diagrams and illustrations into engaging image to video lessons that hold students' attention longer than traditional slides.
Like mentioned before, AIGPTS AI Video Generator is an all-in-one platform, it contains all the popular AI Video models, include Klling AI.
Part 7. Pika Labs — Best for Subtle Animations
Pika has always been the most approachable image to video AI tool. Simple interface, straightforward prompts, and decent output quality. What makes Pika unique is its region-specific editing — you can highlight a specific area of your image and tell the AI to animate only that part.
**Best for:** Subtle animations, beginners, and anyone who wants to animate specific regions of an image.
How to Use Pika to Turn an Image into Video
Step 1: Go to Pika's website or use it through Discord
Visit pika.art and sign up with your Google account or Discord. Pika works both through its web interface and Discord bot — the web interface is more intuitive for beginners.
Step 2: Upload your image
Click the upload button and select your image. Pika supports JPG, PNG, and WebP formats. You can also start by selecting an image from Pika's gallery if you want to experiment.
Step 3: Select the region to animate (optional)
This is Pika's signature feature. Use the region selection tool to highlight a specific area of your image that you want to animate. For example, select only the water in a landscape photo to make it ripple while keeping the mountains still.
Step 4: Enter your motion prompt
Type a description of the motion you want. Be specific: 'ocean waves gently crashing,' 'smoke rising from the chimney,' 'hair blowing in the wind.' If you selected a region, the motion will apply only to that area.
Step 5: Choose style and settings
Pika offers style presets like 'cinematic,' 'anime,' '3D render,' and 'realistic.' Select the one that matches your vision. You can also adjust the motion intensity slider.
Step 6: Generate and download
Click generate. Pika typically produces results in under 2 minutes. Preview your video, and if you like it, download as MP4. You can also share directly to social media from Pika's interface.
Pika's image to video approach is different from most competitors. Instead of animating the entire image, Pika lets you target specific regions for image to video animation. This gives you more control over the final image to video output and produces more natural-looking results. If you've tried other image to video tools and found the results too chaotic, Pika's targeted approach might be exactly what you need.
Part 8. Quick Comparison among these 5 Image to Video AI Tools
| Tool | Best For | Free Tier | Max Length | Watermark | Models |
|---|---|---|---|---|---|
| AIGPTS | Overall value, multi-model | 100 credits/day | 3 min (Kling 3) | No | 11+ |
| Runway | Creative control | One-time credits | 16 sec | No | Gen-4.5 |
| Canva | Beginners | Limited (Pro needed) | Varies | Free: Yes | Built-in |
| Kling AI | Long videos | Signup credits | 3 min | Free: Yes | Kling 3 |
| Pika | Subtle animations | Daily credits | 15 sec | No | Pika 1.0 |
Part 9. Tips for Better Image to Video Results
Getting good results from image to video AI isn't just about picking the right tool. Here are some tips that make a difference for your image to video projects:
· Start with high-quality images. Blurry, low-resolution, or heavily compressed images produce blurry, low-resolution video. Use the best source image you have — ideally 1080p or higher.
· Be specific with motion prompts. Instead of 'make it move,' try 'gentle camera pan right, wind blows through hair, leaves rustling.' Specific prompts produce more controlled results.
· Avoid extreme close-ups for full-body motion. If you want a person to walk or move, start with a full-body shot. Close-up portraits work better for subtle animations like blinking or smiling.
· Experiment with different models. The same image can produce very different results on Kling vs. Runway vs. Veo 3.1. Don't settle for the first output — try multiple models. AIGPTS makes this easy with 11+ models in one place.
· Iterate on your prompts. First generation is rarely perfect. Tweak your motion prompt, adjust the intensity, and regenerate. The best results come from iteration.
· Use the right tool for the job. Need a 2-minute video? Use Kling. Want subtle region animation? Use Pika. Need creative control? Use Runway. Want to try everything? Use AIGPTS.
Part 10. Frequently Asked Questions
Question 1. Is image to video AI free?
Some tools offer free tiers. AIGPTS AI Video Generator gives 7-days free trial with no watermark — the most generous option. Runway offers one-time free credits. Pika provides daily free credits. Canva requires a Pro subscription for full AI features.
Question 2. How long does it take to generate a video from an image?
Most tools generate a video in 30 seconds to 5 minutes. AIGPTS and Hailuo are among the fastest (under 1 minute). Kling 3 for long videos (1-3 minutes) can take 5-15 minutes. Veo 3.1 and Sora 2 Pro take longer due to higher quality processing.
Question 3. Can I use AI-generated videos commercially?
Many tools do not guarantee that the generated content is suitable for commercial use. Users are responsible for ensuring that the content they use complies with applicable laws and regulations and does not infringe upon the legitimate rights and interests of any third parties.
Question 4. What's the longest video I can generate from an image?
Kling 3 supports up to 3 minutes. Sora 2 Pro goes up to 25 seconds. Most other tools cap at 8-16 seconds. For longer content, you can concatenate multiple clips in a video editor. All these models are available on AIGPTS.
Question 5. Do I need video editing skills?
No. Image to video AI tools are designed to work without any editing experience. Upload, prompt, generate. Some tools offer optional editing features, but they're not required.
Question 6. Which tool should I start with?
If you want to try multiple models without paying for separate subscriptions, start with AIGPTS.
Conclusion
Turning an image to video used to require expensive software, technical skills, and hours of work. In 2026, image to video AI takes seconds. Upload a photo, describe the motion, and the AI does the rest.
The 5 image to video tools covered in this guide each have their strengths. The best approach for image to video? Start with AIGPTS AI Video Generator. Its 7-days free trial and 15+ image to video models let you experiment across different AI engines without paying for multiple image to video subscriptions.